How to Build a Self-Hosted WordPress Website
Some of the links on this website are affiliate links. This means a commission may be earned if you click through and make a purchase, at no extra cost to you.
If you’ve ever dreamed of building your own website, one that looks good, loads fast and doesn’t live on a freebie subdomain, this is where you start.
By the end of this in depth guide, you’ll have a working WordPress website. It might not win design awards, but it’ll be yours. A website (or blog) you can build upon, improve over time and use for your business, project, hobby or side hustle.
I’ve been building WordPress websites since 2007. Back then, you had to unzip files, upload them via FTP, create a database, connect a user to that database and hope you’d typed everything correctly.
These days, the installation process is much smoother, safer, and takes no time at all.
So grab a coffee or a nice cup of tea, and let’s get started.
Here’s the five-step plan we’ll follow:
- Buy a domain name from a company like Namecheap (the one I use and recommend)
- Buy suitable web hosting – ‘shared’ hosting is inexpensive and perfect for most people building their first website or starting a blog (I use Guru)
- Install WordPress (the easy way)
- Choose a theme and plugins
- Add your first pages or posts
Follow along, and you’ll not only have a live site in a few hours, you’ll understand how it all fits together. Which will help you develop and grow in the future.
Let’s get the ball rolling by taking a brief look at our chosen software for building a website, WordPress.
Why choose WordPress to build a website or blog?
There are a lot of ways to build a website or money-making blog. But WordPress is the one I use – and so do about 40% of all website owners (including huge brands like PlayStation, Disney, and Spotify).
Why? Because it just works.
WordPress is simple enough for beginners, powerful enough for pros, and free enough for anyone to get started today.
Whether you want a blog, portfolio, business site, or online shop, WordPress can handle it.
And the best part?
You can do everything without ever touching code. WordPress takes care of the hard stuff behind the scenes, so you can focus on creating content and improving the user experience, not fighting with tech.
1) Choose a domain name for your website
To get a website online, you need two things: a domain name and web hosting.
Hosting comes next, but first, let’s sort your domain name. This is the fun bit.
What is a domain name?
A domain name is your website’s address – the bit people type into their browser to find you.
Ours is medlockweb.com. Yours could be your personal name, your business name, your side project, or just something you like the sound of.
If your site’s aimed at people in a specific country, go local with the ending:
- United Kingdom – .co.uk or .uk
- United States – .us
- Germany – .de
- Australia – .com.au
If you want to reach people everywhere, stick with .com. It’s universal, familiar, and still looks the most professional.
Where do you register a domain name?
Most hosting companies throw in a free domain when you sign up – a nice little bonus for your first year. It’s the quickest, easiest way to get started.
When that free period ends, you’ll usually pay around £10–£15 a year to renew.
Plenty of website owners prefer to keep their domain and hosting separate. It’s neater and gives you more control later. If you ever change host, connecting your domain is straightforward – your new provider will guide you through it.
If this is your first website, register the domain and hosting from the same place. It keeps things simple. You can always separate them later if you need to.
If you do want to register a domain name on its own, I recommend Namecheap. First-time purchases and renewals are cheap and their system’s easy to use. They also have good online support via a chat facility, so if you’re stuck, help is at hand.
Domain tips before you buy
A domain name doesn’t belong to you forever – it’s more like a rental. You register it for a set period (usually one year) and can renew it for as long as you want to keep it.
If you forget to renew, the domain can expire and someone else could claim it, so it’s worth switching on auto-renewal with your registrar if it’s a keeper.
Before registering a domain, spend a few minutes checking its history. Some domains have been used before, and if they were part of a spammy network or belonged to a penalised site, that bad history can follow you.
You can check by:
- Searching it on Wayback Machine to see how it looked in the past.
- Googling the domain name in quotes (for example, “mydomain.com”) to spot old listings.
- Checking backlinks using free tools like Ahrefs’ Backlink Checker or SEO Review Tools.
A clean, unused domain is usually the safest bet – especially for your first website.
How much does a domain name cost?
You can grab a domain for just a few pounds in the first year, thanks to discounts and special offers.
After that, expect to pay around £10–£15 a year for a .com, or a little less for a .co.uk.
Fancy endings like .studio, .shop or .photography cost more – and while they’re fun, you don’t need them. A clean, familiar extension works best.
That’s your domain sorted. Next, we’ll find your website a home.
2) Buy web hosting from a reputable company
Your domain name’s ready – now your website needs somewhere to live. This is where web hosting comes in.
What is web hosting?
Web hosting is simply the place where your website’s files live – your pages, images, videos and all the software that runs the site.
When someone types in your web address, their browser connects to your hosting server and loads everything up. Without hosting, your site has nowhere to exist.
What’s the best hosting for a brand-new website?
There are a few hosting types out there, but for a new site, shared hosting is perfect.
Shared hosting means your site shares space on a server with other websites. It keeps costs low and takes care of all the technical bits in the background.
As your site grows and starts pulling in more visitors (a nice problem to have), you might notice it slowing down a little. That’s when you can upgrade your plan or move to a more powerful option – usually with a single click inside your hosting account.
If you ever outgrow your host entirely, most companies will move your site for free, so there’s no stress about starting over.
How much does web hosting cost?
For a new site, shared hosting usually costs between £40–£100 per year, depending on the provider and plan.
Some hosts let you pay monthly, while others offer discounts if you pay yearly. Generally, the longer you commit, the less you pay overall.
A few companies also include your first domain name for free – handy if you haven’t already bought one.
That’s it – your website now has a home. Next up, we’ll install WordPress and bring it to life.
Hosting tips before you sign up
Web hosting is one of those things that sounds simple until you start comparing plans. Prices, features, and “special offers” can be confusing, so here are a few things to watch for before you commit:
- Intro prices are temporary – that £2.99/month headline offer usually jumps to £6–£10/month when it renews. Always check the renewal rate before buying.
- Billing cycles matter – most hosts give you the lowest price if you pay yearly (or for two to three years upfront). Monthly plans are easier to cancel but usually cost more overall.
- “Free” domains only last one year – you’ll pay renewal fees after that.
- Email hosting isn’t always included – some companies charge extra for mailboxes.
- Backups and security add-ons can cost extra – even when they’re advertised as “included”.
- Look for uptime guarantees and support systems – a reliable host with quick, local support will save you hours of frustration later.
Always read the small print and don’t be swayed by flashy discounts. A good host should be upfront about renewal pricing, provide daily backups, and include free SSL as standard.
3) Install WordPress
With your domain name and hosting sorted, it’s time to install WordPress – the software that powers your website.
Back in 2007, when I first started, you had to unzip files, upload them via FTP, and connect them to a database by hand.
It was a slow, painful and fragile process.
Today, the install process takes less than a minute and a couple of clicks.
Your hosting company will do the heavy lifting for you – creating the database, setting permissions, and running through the setup automatically.
You’ll just need to fill in a few details:
- Admin username – the name you’ll use to log in.
- Admin password – choose something secure.
- Admin email address – your main email.
- Website title – you can change this later.
- Tagline – optional and editable at any time.
Some hosts also offer extras, like two-factor authentication or login-limit protection. Tick those boxes if they’re available.
When everything looks good, hit Install and let the system do its thing. Within a minute or so you’ll have a live WordPress site.
Your hosting company should send your login details by email – keep that email somewhere safe.
Log in for the first time
Your new site won’t look fancy yet, but the framework’s in place.
To log in, go to: https://yourdomain.com/wp-login.php
Enter your username and password and you’ll land on the WordPress Dashboard – the control centre for your site.
Here’s what you’ll see in the left-hand menu:
- Home – the main dashboard view.
- Updates – WordPress, theme and plugin updates.
- Posts – create or edit blog posts.
- Media – manage images, videos and other files.
- Pages – create and edit pages.
- Comments – approve or delete comments (if enabled).
- Appearance – choose or customise your theme.
- Plugins – install or manage plugins.
- Users – add or edit users if you’re running a multi-author site.
- Tools – import, export or run site tools.
- Settings – adjust general site settings.
- Collapse menu – toggle between text and icons.
Take a few minutes to click around and get familiar with each section. Nothing you do here can break your site, so explore freely.
You now have a fully working WordPress website.
It’s plain for the moment, but that’s about to change.
Next, we’ll make it look good and add a few useful features by installing a theme and some plugins.
4) Install a WordPress theme that suits the purpose of your website
You’ve got WordPress up and running – now let’s make it look the part.
What is a WordPress theme?
A theme controls how your website looks and feels. It’s a collection of design files that define your layout, fonts, colours and overall style.
WordPress includes a few default themes out of the box, and you can switch to something else any time. There are thousands of free themes to choose from inside your dashboard, plus countless premium options available from independent developers.
For now, we’ll stick with a free theme so you can get familiar with how everything works. I like, use and recommend Kadence. Try it for the sake of this guide, but feel free to switch later on.
A quick word of warning about changing themes
Switching themes is easy, but doing it on a live website that already has a lot of pages or posts can make a mess of your layout. Seriously. I learned the hard way!
Every theme handles images, headings, and blocks slightly differently. When you switch, things like spacing, fonts, and featured images can shift or vanish completely.
If you ever want to change themes later on:
- Test it first on a staging site – a private copy of your site that lets you experiment safely before making changes live. Most good hosts include this feature.
- Check your key pages (like your homepage and contact page) before going live.
- Always back up your site in case something goes wrong.
Changing themes on a live, content-heavy site can seriously mess with your layout, so take your time, test first, and go live only when everything looks right.
How to install a WordPress theme
- In your WordPress dashboard, go to Appearance > Themes.
- Click Add New at the top of the page.
- Browse or search for Kadence or choose a design you like. You can preview any theme to see how it looks.
- When you find one that fits, click Install, then Activate.
That’s it – your site now has a brand-new look. You can change themes as often as you like without affecting your content .
Customising your theme
Once a theme is active, you can personalise it using the Customiser – a built-in tool that shows live previews of your changes.
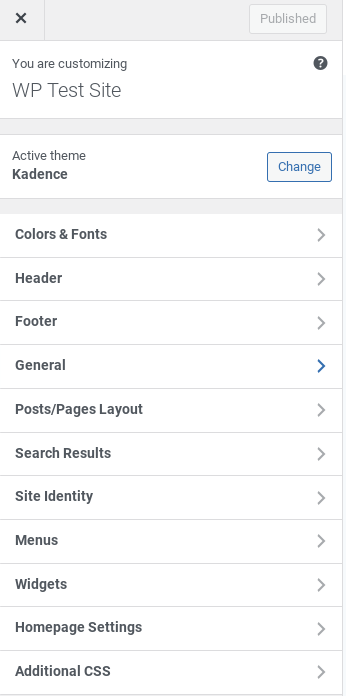
Depending on the theme, you’ll be able to:
- Adjust fonts for headings, menus and body text.
- Choose your colour scheme.
- Switch between full-width and sidebar layouts.
- Edit your header and footer.
- Show or hide items like author names, dates or categories.
- Enable or disable comments or breadcrumbs.
As you tweak things, you’ll see the results instantly on screen. If you like what you see, click Publish to save your changes.
Don’t worry about getting every detail right now – pick a layout and colour scheme you like and move on. You can always come back later. Your site won’t look that good until you start adding content, anyway.
About pre-filled templates
Some themes come with demo templates that include sample pages, images, and text. They’re there to show you what the design looks like in action.
You can import one if you want a quick head start, or skip it and build your pages from scratch. Just remember to replace any demo content before you publish. You don’t want “Lorem ipsum” showing up everywhere.
5) Install some WordPress plugins
Plugins are what make WordPress so powerful. They’re small pieces of software that add new features or improve how your site works.
Want to speed up your website, add a contact form, or improve SEO? There’s a plugin for almost everything.
But here’s the catch – it’s easy to get carried away. Installing too many can slow your site down or cause conflicts between plugins. So in the early days, keep things simple and only add what you really need.
How to install a plugin
- In your WordPress dashboard, go to Plugins > Add New.
- Use the search bar to find what you’re looking for (for example, “contact form” or “SEO”).
- When you find one that looks good, check the reviews, active installations and “Last updated” date. Choose plugins that are well maintained and compatible with your version of WordPress.
- Click Install Now, then Activate.
That’s it – your plugin is now live.
Most plugins work straight away after activation, but some need a bit of setup. You’ll usually find their settings under Settings, Tools, or in their own menu section on the left.
What kinds of plugins to look for
You don’t need many to get started, but a few useful categories include:
- Performance – caching or optimisation tools that help your site load faster.
- SEO – plugins that help search engines understand your content.
- Security and backups – extra protection and peace of mind.
- Contact forms – so visitors can get in touch easily.
- Analytics – to track your visitors and see what’s working.
Your hosting company might already include some of these features, so check before adding extras.
As your site grows, you’ll discover new plugins that make sense for your goals. Just remember: quality over quantity.
At Medlock Web, I keep things lean by using just twelve plugins, five of which come with Kadence. Fewer plugins mean fewer problems and faster load times.
6) Add content to your new WordPress website
Now comes the part that turns your website into something real – the content.
In WordPress, there are two main content types: Pages and Posts.
- Pages are for timeless content – your homepage, about page, contact page, or services.
- Posts are for articles, news, and updates that appear in your blog feed.
You can use both, but for now, let’s just get a feel for how they work.
How to create a page
- In your dashboard, click Pages > Add New.
- Give your page a title (for example, About Us).
- Use the block editor to add text, headings, lists, or images.
WordPress uses “blocks” to build everything you see on a page. Each paragraph, image, or button is its own block that you can move or edit individually.
When you’re happy, click Publish. If you’re not ready yet, click Save Draft.
How to create a post
- Go to Posts > Add New.
- Add a title and write your content in the editor.
- On the right-hand side, choose a Category (you can add a new one if needed).
- Click Publish.
That’s your first post live on the internet.
You can view it by clicking View Post.
Getting comfortable with the editor
The WordPress editor is flexible and forgiving. You can:
- Add headings, paragraphs, quotes, and lists.
- Insert images, videos, and galleries.
- Add buttons, columns, and separators for layout.
- Embed content from sites like YouTube, Instagram, or Spotify.
Experiment a little – you can always edit or delete anything later.
A quick tip
Don’t worry if your site still looks plain at this stage. The more content you add, the more your design comes to life. Start with your key pages and one or two posts. You can always refine things later.
That’s it – you’ve just built and published your first WordPress site from scratch.
Now it’s time to start growing it with new content, search optimisation, and a few smart tweaks behind the scenes.
Final touches and next steps
You’ve done it – your website’s live, your theme’s set up, and you’ve published your first page or post.
That’s a huge milestone, so take a minute to appreciate how far you’ve come.
Even though your site’s online, there’s always more you can do to improve it. Here are a few ideas to guide your next steps.
Quick tips for new website owners
- Keep it updated. Log in once a week to check for plugin, theme, and WordPress updates.
- Create regular backups. Many hosts do this automatically, but it’s worth confirming.
- Add content often. A steady stream of useful posts helps your site grow faster.
- Track your progress. Connect Google Analytics or another stats tool to see what’s working.
- Don’t chase perfection. Tidy and consistent beats fancy and unfinished every time.
Common mistakes to avoid
- Installing too many plugins.
- Ignoring updates and backups.
- Using demo text or images for too long.
- Forgetting to write an About or Contact page.
- Overcomplicating your design before you’ve added content.
Keep those in mind and you’ll save yourself a lot of time and frustration later.
Recommended products and services:
- Namecheap for domain names and hosting
- Guru for UK hosting
- GeneratePress free theme with a premium version available (it’s the one used on this site)
Wrapping up
Building your first website can feel like a big task, but you’ve just seen how straightforward it really is.
With WordPress, the right hosting, and a little patience, you can go from an idea to a live website in an afternoon.
The next step? Keep building. Add more pages, write posts, and share your work especially with me if this guide has helped you.
Featured image by Burst via Pexels